如何给NGINX安装ngx_http_geoip2_module模块
现在需要给NGINX安装 ngx_http_geoip2_module 模块,以方便做adsense的过滤ip和isp的操作。安装ngx_http_geoip2_module模块有以下几个步骤:
- 安装libmaxminddb模块
- 编译安装ngx_http_geoip2_module模块
- 配置NGINX的ngx_http_geoip2_module模块
开始之前,我们需要确保服务器已经拥有gcc编译环境,如果你的系统还没有安装,可以先安装好编译环境再继续。
如果你是使用宝塔面板,那么编译环境是已经准备好的,可以直接进行下一步操作。
如果你是使用ubuntu系统,可以用过apt直接安装编译环境:
$ sudo apt update
$ sudo apt install build-essential -y
准备好编译环境,我们就可以正式开始了。
1. 安装libmaxminddb模块
安装libmaxminddb有两种方法,一种是通过源码编译安装,一种是直接通过apt安装,如果大家使用ubuntu,就可以简单的使用apt直接安装了。我先介绍一下通过apt安装。
a. 通过apt安装libmaxminddb模块
此方法在Ubuntu 18.04.1 LTS测试通过。首先给APT添加PPA软件源:
$ sudo add-apt-repository ppa:maxmind/ppa
接下来安装相关软件包:
$ sudo apt update
$ sudo apt install libmaxminddb0 libmaxminddb-dev mmdb-bin
b. 通过源码编译安装
一般通过编译安装可以通过git clone在github上的最新的源码,也可以通过release页面下载最新发行版tar包。
通过git clone在github上最新的源码:
$ git clone --recursive https://github.com/maxmind/libmaxminddb
$ cd libmaxminddb
$ ./bootstrap
此时源码已保存在当前路径的libmaxminddb文件夹中。
通过release页面下载最新发行版tar包:
我们打开https://github.com/maxmind/libmaxminddb/releases页面查看最新的发行版tar包地址为:https://github.com/maxmind/libmaxminddb/releases/download/1.3.2/libmaxminddb-1.3.2.tar.gz
$ wget https://github.com/maxmind/libmaxminddb/releases/download/1.3.2/libmaxminddb-1.3.2.tar.gz
$ tar xzvf libmaxminddb-1.3.2.tar.gz
$ cd libmaxminddb-1.3.2
此时源码已保存在当前路径的libmaxminddb-1.3.2文件夹中。
编译安装libmaxminddb:
上一步我们已经切换到源码文件夹中,我们直接开始输入编译命令即可。
$ ./configure
$ make
$ make check
$ sudo make install
$ sudo ldconfig
这时如果以上的步骤没有出错,我们的libmaxminddb就安装好了。我们可以输入mmdblookup看看是否安装成功。
$ mmdblookup --version

  mmdblookup version 1.3.2
出现这个表示安装成功了。
2.编译安装ngx_http_geoip2_module模块
我在安装ngx_http_geoip2_module模块的时候碰到好多坑,如果看这么文章的读者对nginx编译不太熟悉的话,请严格按照我的步骤进行。
首先,我们要下载ngx_http_geoip2_module的源码
一样我们可以通过github直接clone源码或者下在release包再解压出源码,我现在使用release包解压的方法进行操作。
打开ngx_http_geoip2_module的release页面https://github.com/leev/ngx_http_geoip2_module/releases,我们下载最新的3.0版本:https://github.com/leev/ngx_http_geoip2_module/archive/3.0.tar.gz
$ wget https://github.com/leev/ngx_http_geoip2_module/archive/3.0.tar.gz
$ tar xzvf 3.0.tar.gz
这时候源码已经保存当前路径的ngx_http_geoip2_module-3.0文件夹中。
然后,我们需要获得与当前nginx版本相同的源码
这是我这边也分两种情况,一种是自己通过apt安装的nginx,一种是通过bt.cn宝塔面板编译安装的nginx。
如果是通过宝塔面板编译安装的nginx,这种情况就简单一些,根据宝塔默认的安装路径,nginx的源码保存在/www/server/nginx/src,我们只用切换到这个路径进行下一步操作就好了。
$ cd /www/server/nginx/src
这时候不要再下载nginx源码,因为宝塔的nginx编译参数都是需要在这个目录中执行的,防止意外情况发生,我们就在这个目录操作就好了。
———-
现在我讲讲在ubuntu上通过apt安装的nginx怎么找源码。首选需要保证源码的版本和当前运行nginx的版本要一致。运行一下命令查看nginx的版本号:
$ nginx -v
nginx version: nginx/1.14.0 (Ubuntu)
可以看到我的nginx是1.14.0版本,在NGINX官网找到这个版本的下载店址:http://nginx.org/download/nginx-1.14.0.tar.gz
$ wget http://nginx.org/download/nginx-1.14.0.tar.gz
$ tar xzvf nginx-1.14.0.tar.gz
$ cd nginx-1.14.0
这是便下载好了nginx源码并切换到了nginx的源码文件夹中。
接下来,我们开始编译ngx_http_geoip2_module模块
其实之前的步骤都还比较简单的,我之前操作过都没遇到啥坑。但是到了这一步,我就碰到编译出来的模块死活用不了,一度放弃这个模块的地步。后来查了好多资料,才解决这个问题,就是要保持运行的nginx编译时的参数需要和编译模块的参数保持一致才行。真是搞死个人。
所以,我们先查看当前nginx的编译参数:
$ nginx -V
nginx version: nginx/1.14.0 (Ubuntu)
built with OpenSSL 1.1.0g  2 Nov 2017
TLS SNI support enabled
configure arguments: --with-cc-opt='-g -O2 -fdebug-prefix-map=/build/nginx-mcUg8N/nginx-1.14.0=. -fstack-protector-strong -Wformat -Werror=format-security -fPIC -Wdate-time -D_FORTIFY_SOURCE=2' --with-ld-opt='-Wl,-Bsymbolic-functions -Wl,-z,relro -Wl,-z,now -fPIC' --prefix=/usr/share/nginx --conf-path=/etc/nginx/nginx.conf --http-log-path=/var/log/nginx/access.log --error-log-path=/var/log/nginx/error.log --lock-path=/var/lock/nginx.lock --pid-path=/run/nginx.pid --modules-path=/usr/lib/nginx/modules --http-client-body-temp-path=/var/lib/nginx/body --http-fastcgi-temp-path=/var/lib/nginx/fastcgi --http-proxy-temp-path=/var/lib/nginx/proxy --http-scgi-temp-path=/var/lib/nginx/scgi --http-uwsgi-temp-path=/var/lib/nginx/uwsgi --with-debug --with-pcre-jit --with-http_ssl_module --with-http_stub_status_module --with-http_realip_module --with-http_auth_request_module --with-http_v2_module --with-http_dav_module --with-http_slice_module --with-threads --with-http_addition_module --with-http_geoip_module=dynamic --with-http_gunzip_module --with-http_gzip_static_module --with-http_image_filter_module=dynamic --with-http_sub_module --with-http_xslt_module=dynamic --with-stream=dynamic --with-stream_ssl_module --with-mail=dynamic --with-mail_ssl_module
可以看到configure arguments:后面一串,便是编译参数(注意:可能你的服务器上nignx的编译参数和我不一样,所以请以实际情况位准,我只给出一个参考),我们先复制下来,然后在最后面加上一个编译ngx_http_geoip2_module模块的参数
--add-dynamic-module=/root/dev/ngx_http_geoip2_module-3.0
其中“/root/dev/ngx_http_geoip2_module-3.0”是上一个操作中我保存了ngx_http_geoip2_module-3.0源码的地址。根据你们自己保存源码的位置做适当调成即可。注意在添加的参数前需要加上空格。我这里完整的参数为:
--with-cc-opt='-g -O2 -fdebug-prefix-map=/build/nginx-mcUg8N/nginx-1.14.0=. -fstack-protector-strong -Wformat -Werror=format-security -fPIC -Wdate-time -D_FORTIFY_SOURCE=2' --with-ld-opt='-Wl,-Bsymbolic-functions -Wl,-z,relro -Wl,-z,now -fPIC' --prefix=/usr/share/nginx --conf-path=/etc/nginx/nginx.conf --http-log-path=/var/log/nginx/access.log --error-log-path=/var/log/nginx/error.log --lock-path=/var/lock/nginx.lock --pid-path=/run/nginx.pid --modules-path=/usr/lib/nginx/modules --http-client-body-temp-path=/var/lib/nginx/body --http-fastcgi-temp-path=/var/lib/nginx/fastcgi --http-proxy-temp-path=/var/lib/nginx/proxy --http-scgi-temp-path=/var/lib/nginx/scgi --http-uwsgi-temp-path=/var/lib/nginx/uwsgi --with-debug --with-pcre-jit --with-http_ssl_module --with-http_stub_status_module --with-http_realip_module --with-http_auth_request_module --with-http_v2_module --with-http_dav_module --with-http_slice_module --with-threads --with-http_addition_module --with-http_geoip_module=dynamic --with-http_gunzip_module --with-http_gzip_static_module --with-http_image_filter_module=dynamic --with-http_sub_module --with-http_xslt_module=dynamic --with-stream=dynamic --with-stream_ssl_module --with-mail=dynamic --with-mail_ssl_module --add-dynamic-module=/root/dev/ngx_http_geoip2_module-3.0
接下来开始编译ngx_http_geoip2_module模块
开始之前,根据我之前使用configure检查的结果,在ubuntu 18.04.1版本下的nginx编译前需要先安装以下依赖:
$ sudo apt update
$ sudo apt install libpcre3-dev libssl-dev zlib1g-dev libxml2-dev libxslt1-dev libgd-dev libgeoip-dev -y
由于我们已经在nginx的源代码目录中,我们开始执行编译命令
$ ./configure --with-cc-opt='-g -O2 -fdebug-prefix-map=/build/nginx-mcUg8N/nginx-1.14.0=. -fstack-protector-strong -Wformat -Werror=format-security -fPIC -Wdate-time -D_FORTIFY_SOURCE=2' --with-ld-opt='-Wl,-Bsymbolic-functions -Wl,-z,relro -Wl,-z,now -fPIC' --prefix=/usr/share/nginx --conf-path=/etc/nginx/nginx.conf --http-log-path=/var/log/nginx/access.log --error-log-path=/var/log/nginx/error.log --lock-path=/var/lock/nginx.lock --pid-path=/run/nginx.pid --modules-path=/usr/lib/nginx/modules --http-client-body-temp-path=/var/lib/nginx/body --http-fastcgi-temp-path=/var/lib/nginx/fastcgi --http-proxy-temp-path=/var/lib/nginx/proxy --http-scgi-temp-path=/var/lib/nginx/scgi --http-uwsgi-temp-path=/var/lib/nginx/uwsgi --with-debug --with-pcre-jit --with-http_ssl_module --with-http_stub_status_module --with-http_realip_module --with-http_auth_request_module --with-http_v2_module --with-http_dav_module --with-http_slice_module --with-threads --with-http_addition_module --with-http_geoip_module=dynamic --with-http_gunzip_module --with-http_gzip_static_module --with-http_image_filter_module=dynamic --with-http_sub_module --with-http_xslt_module=dynamic --with-stream=dynamic --with-stream_ssl_module --with-mail=dynamic --with-mail_ssl_module --add-dynamic-module=/root/dev/ngx_http_geoip2_module-3.0
$ make
$ make modules
如果在configure的时候发生错误,请根据提示补装相应的依赖关系。
编译完成后,我们切换到objs目录,可以看到我们想要的两个库文件:
ngx_http_geoip2_module.so
ngx_stream_geoip2_module.so
接下来我们把这两个文件移动到/usr/lib/nginx/modules路径下,方便下一步的操作。
$ cd objs
$ mv ngx_http_geoip2_module.so /usr/lib/nginx/modules
$ mv ngx_stream_geoip2_module.so /usr/lib/nginx/modules
3. 配置NGINX的ngx_http_geoip2_module模块
配置nginx的ngx_http_geoip2_module相关参数前,我们从maxmind的官网上下载GeoLite2 City的数据库。
土豪可以购买付费库以获得更多更精确的信息。我们这里使用lite版的city库就够了,另外我还使用了付费的isp库,这个库来之不易,有兴趣可以留言联系我领取。
下载好GeoLite2 City库,我们可以把他放到/var/geoipo2/下方便使用。
$ mkdir /var/geoip2
$ wget http://geolite.maxmind.com/download/geoip/database/GeoLite2-City.tar.gz
$ tar xzvf GeoLite2-City.tar.gz
$ mv GeoLite2-City_20180807/GeoLite2-City.mmdb /var/geoip2/
使用mmdblookup命令在库中搜索试试:
$ mmdblookup -f /var/geoip2/GeoLite2-City.mmdb -i 27.18.29.164

  {
    "city":
      {
        "geoname_id":
          1791247 <uint32>
        "names":
          {
            "de":
              "Wuhan" <utf8_string>
            "en":
              "Wuhan" <utf8_string>
            "es":
              "Wuhan" <utf8_string>
            "fr":
              "Wuhan" <utf8_string>
            "ja":
              "武漢市" <utf8_string>
            "pt-BR":
              "Wuhan" <utf8_string>
            "ru":
              "Ухань" <utf8_string>
            "zh-CN":
              "武汉" <utf8_string>
          }
      }
    "continent":
      {
        "code":
          "AS" <utf8_string>
        "geoname_id":
          6255147 <uint32>
        "names":
          {
            "de":
              "Asien" <utf8_string>
            "en":
              "Asia" <utf8_string>
            "es":
              "Asia" <utf8_string>
            "fr":
              "Asie" <utf8_string>
            "ja":
              "アジア" <utf8_string>
            "pt-BR":
              "Ásia" <utf8_string>
            "ru":
              "Азия" <utf8_string>
            "zh-CN":
              "亚洲" <utf8_string>
          }
      }
    "country":
      {
        "geoname_id":
          1814991 <uint32>
        "iso_code":
          "CN" <utf8_string>
        "names":
          {
            "de":
              "China" <utf8_string>
            "en":
              "China" <utf8_string>
            "es":
              "China" <utf8_string>
            "fr":
              "Chine" <utf8_string>
            "ja":
              "中国" <utf8_string>
            "pt-BR":
              "China" <utf8_string>
            "ru":
              "Китай" <utf8_string>
            "zh-CN":
              "中国" <utf8_string>
          }
      }
    "location":
      {
        "accuracy_radius":
          1 <uint16>
        "latitude":
          30.580100 <double>
        "longitude":
          114.273400 <double>
        "time_zone":
          "Asia/Shanghai" <utf8_string>
      }
    "registered_country":
      {
        "geoname_id":
          1814991 <uint32>
        "iso_code":
          "CN" <utf8_string>
        "names":
          {
            "de":
              "China" <utf8_string>
            "en":
              "China" <utf8_string>
            "es":
              "China" <utf8_string>
            "fr":
              "Chine" <utf8_string>
            "ja":
              "中国" <utf8_string>
            "pt-BR":
              "China" <utf8_string>
            "ru":
              "Китай" <utf8_string>
            "zh-CN":
              "中国" <utf8_string>
          }
      }
    "subdivisions":
      [
        {
          "geoname_id":
            1806949 <uint32>
          "iso_code":
            "HB" <utf8_string>
          "names":
            {
              "de":
                "Hubei" <utf8_string>
              "en":
                "Hubei" <utf8_string>
              "es":
                "Hubei" <utf8_string>
              "fr":
                "Province de Hubei" <utf8_string>
              "ja":
                "湖北省" <utf8_string>
              "pt-BR":
                "Hubei" <utf8_string>
              "ru":
                "Хубэй" <utf8_string>
              "zh-CN":
                "湖北省" <utf8_string>
            }
        }
      ]
  }
很好很强大,ipv4和ipv6都是可以查寻的。
接下来打开NGINX的配置文件nginx.conf,如果是在ubuntu下通过apt安装,配置文件保存在/etc/nginx/中,如果是通过宝塔面板安装,被指文件保存在/www/server/nginx/conf/中。
在nginx.conf中第一行加入
load_module /usr/lib/nginx/modules/ngx_http_geoip2_module.so;
用来引用ngx_http_geoip2_module模块,接下来在http代码块中加入以下代码
    geoip2 /var/geoip2/GeoLite2-City.mmdb {
        $geoip2_data_city_continent_code continent code;
        $geoip2_data_city_continent_name continent names zh-CN;
        $geoip2_data_city_country_code country iso_code;
        $geoip2_data_city_country_name country names zh-CN;
        $geoip2_data_city_region_code subdivisions 0 iso_code;
        $geoip2_data_city_region_name subdivisions 0 names zh-CN;
        $geoip2_data_city_location_latitude location latitude;
        $geoip2_data_city_location_longitude location longitude;
        $geoip2_data_city_postal postal code;
        $geoip2_data_city_city_name city names en;
    }
表示通过ngx_http_geoip2_module根据访问这个ip获得相应的geo信息。
接下来打开fastcgi.conf文件,在文件末尾添加以下代码:
fastcgi_param MM_CONTINENT_CODE $geoip2_data_city_continent_code;
fastcgi_param MM_CONTINENT_NAME $geoip2_data_city_continent_name;
fastcgi_param MM_COUNTRY_CODE $geoip2_data_city_country_code;
fastcgi_param MM_COUNTRY_NAME $geoip2_data_city_country_name;
fastcgi_param MM_REGION_CODE $geoip2_data_city_region_code;
fastcgi_param MM_REGION_NAME $geoip2_data_city_region_name;
fastcgi_param MM_LATITUDE $geoip2_data_city_location_latitude;
fastcgi_param MM_LONGITUDE $geoip2_data_city_location_longitude;
fastcgi_param MM_POSTAL_CODE $geoip2_data_city_postal;
fastcgi_param MM_CITY_NAME $geoip2_data_city_city_name;
这样就可以将geo信息传递到php上了。
配置好以后重载一下nginx
$ sudo service nginx reload
如果不报错就没啥问题了,这是可以写个phpinfo看看效果。
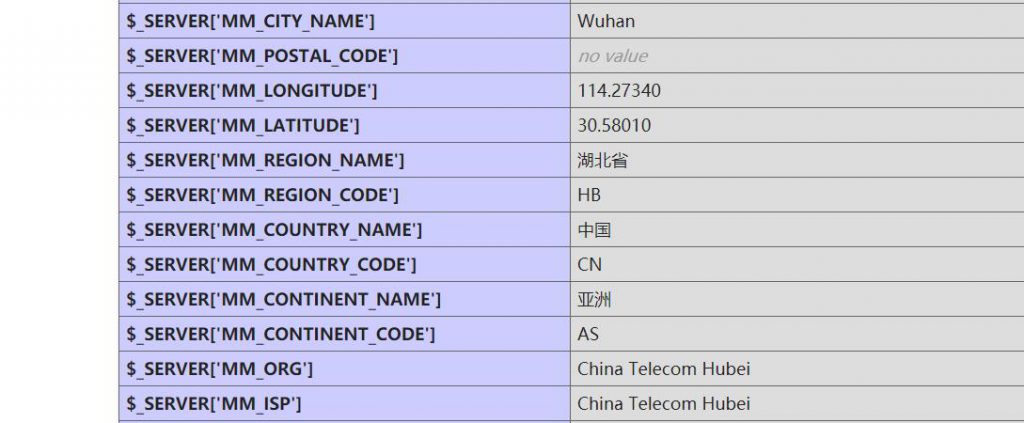 phpinfo查看geo信息
哈哈,完美。
4. 其他
如果拥有了isp的库
你就可以通过在nginx.conf中添加以下代码
    geoip2 /var/geoip2/GeoIP2-ISP.mmdb {
        $geoip2_data_isp_isp isp;
        $geoip2_data_isp_org organization;
    }
并在fastcgi.conf文件中添加以下代码
fastcgi_param MM_ISP $geoip2_data_isp_isp;
fastcgi_param MM_ORG $geoip2_data_isp_org;
完成isp信息的读取。
如果使用了cloudflare加速你的网站
这是默认获取的ip其实不是客户端ip而是cloudflare的cdn服务器IP,这时候在nginx.conf中的代码需要做调整,将source指定为$HTTP_CF_CONNECTING_IP,完整代码如下:
    geoip2 /var/geoip2/GeoLite2-City.mmdb {
	auto_reload 60m;
        $geoip2_data_city_continent_code source=$HTTP_CF_CONNECTING_IP continent code;
        $geoip2_data_city_continent_name source=$HTTP_CF_CONNECTING_IP continent names zh-CN;
        $geoip2_data_city_country_code source=$HTTP_CF_CONNECTING_IP country iso_code;
        $geoip2_data_city_country_name source=$HTTP_CF_CONNECTING_IP country names zh-CN;
        $geoip2_data_city_region_code source=$HTTP_CF_CONNECTING_IP subdivisions 0 iso_code;
        $geoip2_data_city_region_name source=$HTTP_CF_CONNECTING_IP subdivisions 0 names zh-CN;
        $geoip2_data_city_location_latitude source=$HTTP_CF_CONNECTING_IP location latitude;
        $geoip2_data_city_location_longitude source=$HTTP_CF_CONNECTING_IP location longitude;
        $geoip2_data_city_postal source=$HTTP_CF_CONNECTING_IP postal code;
        $geoip2_data_city_city_name source=$HTTP_CF_CONNECTING_IP city names en;
    }

    geoip2 /var/geoip2/GeoIP2-ISP.mmdb {
        auto_reload 60m;
        $geoip2_data_isp_isp source=$HTTP_CF_CONNECTING_IP isp;
        $geoip2_data_isp_org source=$HTTP_CF_CONNECTING_IP organization;
    }
同理,如果用了nginx反向代理,则需要将serouce指定为$HTTP_X_FORWARDED_FOR,这里不再赘述。
参考内容
- ngx_http_geoip2_module使用说明:https://github.com/leev/ngx_http_geoip2_module/blob/master/README.md
- libmaxminddb使用说明:https://github.com/maxmind/libmaxminddb/blob/master/README.md
- nginx 添加 ngx_http_geoip2_module 模块:https://my.oschina.net/u/3786005/blog/1858090